Bootstrap Textarea Input
Intro
Inside the pages we develop we operate the form features in order to get some info from the website visitors and send it back to the site founder completing various functions. To execute it properly-- suggesting receiving the appropriate responses, the appropriate questions needs to be questioned so we architect out forms form thoroughly, consider all the conceivable circumstances and types of relevant information needed and actually presented.
But regardless just how accurate we have this, generally there always are some cases when the info we desire from the user is relatively blurred just before it becomes really presented and needs to extend over even more than just the normal a single or else a few words normally written in the input fields. That's where the # element arrives-- it is certainly the only and irreplaceable element in which the site visitors can freely write back several lines supplying a responses, sharing a reason for their activities or just a few thoughts to eventually assist us making the product or service the web page is about much better.
How to work with the Bootstrap textarea:
Within the current edition of the absolute most popular responsive framework-- Bootstrap 4 the Bootstrap Textarea Button component is completely assisted automatically correcting to the size of the display screen web page gets shown on.
Generating it is pretty simple - everything you really need is a parent wrapper <div> component possessing the .form-group class put on. In it we require to apply a label for the <textarea> component possessing the for = “ - the textarea ID - " and necessary inscription in order to make things easy for the site visitor to comprehend precisely what kind of relevant information you would require written in.
Next we require to create the <textarea> element in itself-- appoint it the .form-control class as well as an appropriate ID. Do note the ID you have specified in the for = "" attribute if the former <label> ought to fit the one to the <textarea> element. You need to in addition add in a rows=" ~ number ~ " attribute in order to specify the lines the <textarea> will originally extend when it gets presented when the page initially loads-- 3 to 5 is a nice value for this one given that if the text message becomes excessive the user is able to regularly resize this control via dragging or simply apply the internal scrollbar appearing if message gets too much.
Since this is certainly a responsive feature by default it spreads out the entire size of its parent component.
More tips
On the contrast-- there are definitely several scenarios you might prefer to reduce the feedback offered within a <textbox> to a certain length in characters-- if this is your circumstance you should also add in a maxlenght = " ~ some number here ~ " attribute establishing the characters limit you desire-- do consider very carefully though if the limit you establish will be enough for the data you require to be composed properly and revealed enough-- bear in mind just how disappointed you were when you were requested something and at the center of the answer were incapable to write additionally-- this is actually important given that it it possible reaching the limit might possibly irritate the visitors and drive them away from submitting the form and even from the page itself.
Good examples
Bootstrap's form regulations increase on Rebooted form styles with classes. Apply these classes to opt inside their modified displays for a more consistent rendering throughout browsers and tools . The example form below demonstrates typical HTML form elements that get improved formats from Bootstrap with additional classes.
Always remember, due to the fact that Bootstrap uses the HTML5 doctype, all of the inputs must have a type attribute.

<form>
<div class="form-group">
<label for="exampleInputEmail1">Email address</label>
<input type="email" class="form-control" id="exampleInputEmail1" aria-describedby="emailHelp" placeholder="Enter email">
<small id="emailHelp" class="form-text text-muted">We'll never share your email with anyone else.</small>
</div>
<div class="form-group">
<label for="exampleInputPassword1">Password</label>
<input type="password" class="form-control" id="exampleInputPassword1" placeholder="Password">
</div>
<div class="form-group">
<label for="exampleSelect1">Example select</label>
<select class="form-control" id="exampleSelect1">
<option>1</option>
<option>2</option>
<option>3</option>
<option>4</option>
<option>5</option>
</select>
</div>
<div class="form-group">
<label for="exampleSelect2">Example multiple select</label>
<select multiple class="form-control" id="exampleSelect2">
<option>1</option>
<option>2</option>
<option>3</option>
<option>4</option>
<option>5</option>
</select>
</div>
<div class="form-group">
<label for="exampleTextarea">Example textarea</label>
<textarea class="form-control" id="exampleTextarea" rows="3"></textarea>
</div>
<div class="form-group">
<label for="exampleInputFile">File input</label>
<input type="file" class="form-control-file" id="exampleInputFile" aria-describedby="fileHelp">
<small id="fileHelp" class="form-text text-muted">This is some placeholder block-level help text for the above input. It's a bit lighter and easily wraps to a new line.</small>
</div>
<fieldset class="form-group">
<legend>Radio buttons</legend>
<div class="form-check">
<label class="form-check-label">
<input type="radio" class="form-check-input" name="optionsRadios" id="optionsRadios1" value="option1" checked>
Option one is this and that—be sure to include why it's great
</label>
</div>
<div class="form-check">
<label class="form-check-label">
<input type="radio" class="form-check-input" name="optionsRadios" id="optionsRadios2" value="option2">
Option two can be something else and selecting it will deselect option one
</label>
</div>
<div class="form-check disabled">
<label class="form-check-label">
<input type="radio" class="form-check-input" name="optionsRadios" id="optionsRadios3" value="option3" disabled>
Option three is disabled
</label>
</div>
</fieldset>
<div class="form-check">
<label class="form-check-label">
<input type="checkbox" class="form-check-input">
Check me out
</label>
</div>
<button type="submit" class="btn btn-primary">Submit</button>
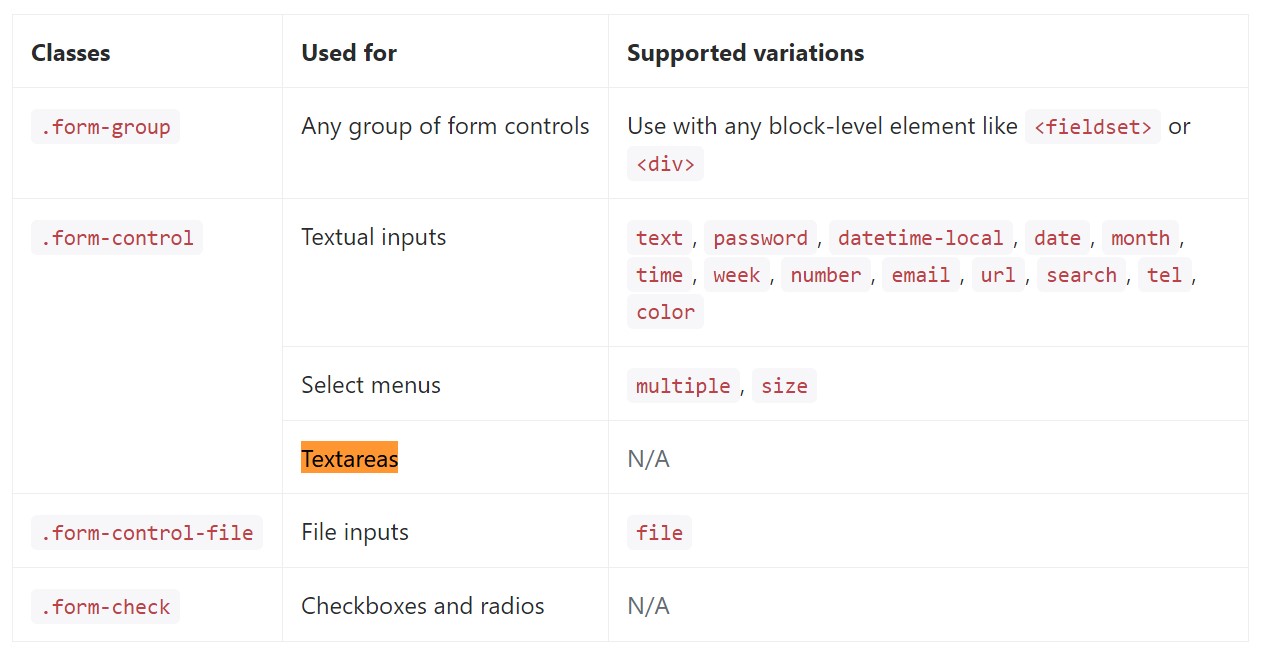
</form>Below is simply a full listing of the specific form controls sustained simply by Bootstrap and the classes that customize them. Extra documentation is available for every group.
Final thoughts
And so currently you know ways to establish a <textarea> feature inside your Bootstrap 4 powered web pages-- presently all you require to identify are the right questions to ask.
Inspect several on-line video tutorials regarding Bootstrap Textarea Modal:
Linked topics:
Basics of the textarea
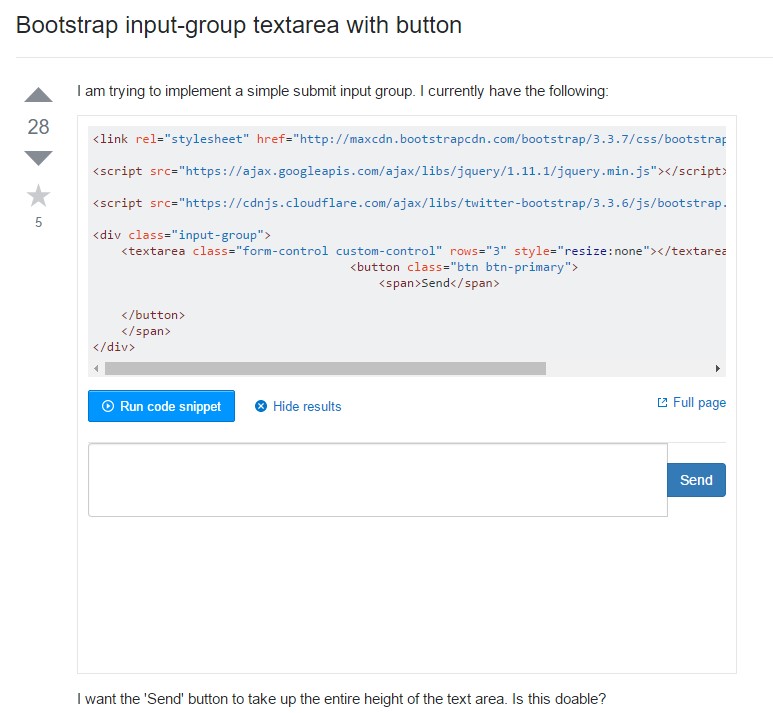
Bootstrap input-group Textarea button by using
Establish Textarea width to 100% in Bootstrap modal
